Get Started with the Calamari REST API and PHP
- Table of contents
- Get Started with the Calamari REST API and PHP
Introduction
So you've spent some time getting your Ceph cluster configured just the way you like it, everything is balances, your data is being read and written safely and securely and things are humming along nicely. But then, when you least expect it, an SSD goes down, you've lost a journal and an OSD. Ceph is self-healing, so you're not too worried about data loss...but you still need to know which nodes are affected and, once you swap in a new SSD, you need to be able to monitor things for a few hours or days to make sure it was an isolated incident and not the first segment of a larger problem.
It's precisely to address these sorts of monitoring and control needs that Calamari was created. Calamari is an API for Ceph, allowing Ceph administrators to get a birds-eye view of Ceph cluster status and providing an all-in-one management and monitoring service for cluster elements. Like Ceph itself, it's open source and freely downloadable from Github.
In this article, I'll introduce you to Calamari, show you how to install it and connect it to your Ceph cluster, and then run you through a few quick examples of how to use it. Once you understand how it works, you can easily integrate Ceph with your own user interface or with third-party applications using the Calamari API. Keep reading, you're going to enjoy this!
Understanding Calamari
Calamari is a management and monitoring service for Ceph exposing a high-level REST API. One of the primary goals for the REST API is to make it easy to integrate Ceph with your own user interface. A reference implementation for this user interface already exists as Romana.
The Calamari REST API is different from the REST API included with Ceph itself. The Ceph REST API functions more as a wrapper around equivalent Ceph CLI commands, while the Calamari REST API operates at a higher level and allows API consumers to manipulate Ceph objects using GET/POST/PUT/DELETE commands.
This tutorial will focus specifically on using the Calamari REST API to perform common operations on your Ceph cluster. My weapon of choice for interacting with the REST API will be PHP, although you should be able to easily migrate the code listings to other programming languages as well.
Assumptions and Requirements
To follow the steps in this tutorial, you'll need an Ubuntu or CentOS server on which to install Calamari and your PHP scripts. This server should be network-accessible by your Ceph cluster. Although I'll be using a VirtualBox server running CentOS 7 for this tutorial, the steps below have also been tested to work on Amazon Web Services (AWS) cloud servers running both Ubuntu and CentOS.Before we get started, here are a few key assumptions that I'll be making:
- You have a working knowledge of CentOS, VirtualBox and VirtualBox networking.
- You have downloaded and installed the latest version of VirtualBox.
- You're familiar with installing software using yum, the CentOS package manager.
- You're familiar with common git operations.
- You have a working understanding of REST APIs and common REST operations.
- You have some familiarity with PHP scripting.
- You have administrative access to a working Ceph cluster with at least 3 nodes.
In case you’re not familiar with the above topics, look in the “Read More” section at the end of this tutorial, which has links to relevant guides.
Did you check all the boxes above? Let's get started!
Step 1: Install Calamari
To begin, initialize a new VirtualBox server with CentOS 7, configure networking to make sure it's connect to the Internet and is also accessible by your Ceph cluster, and then run the following commands as root to install some basic necessities:shell> yum update
shell> yum install git
shell> yum install sudo
shell> yum install wget
Next, create a calamari user account and add it to the sudoers list:shell> useradd calamari
shell> passwd calamari
shell> gpasswd -a calamari wheel
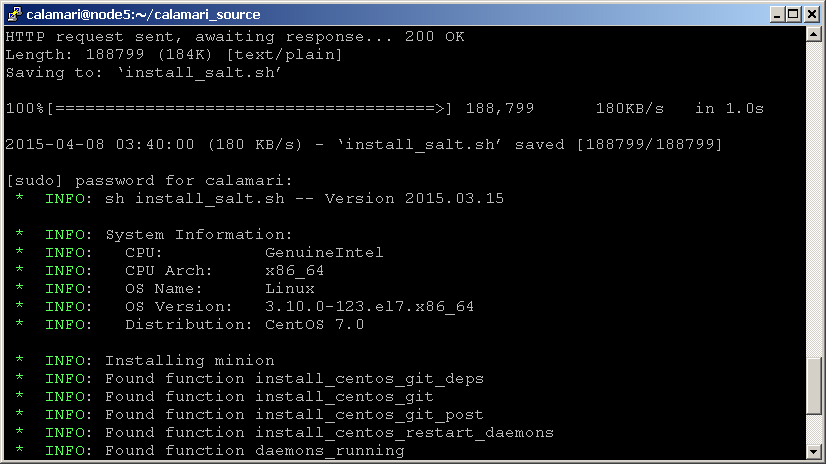
You should now log in as the calamari user, clone the Calamari repository and install Calamari, as below:shell> git clone https://github.com/ceph/calamari.git calamari_source
shell> cd calamari_source
shell> ./vps_bootstrap.sh
The vps_bootstrap.sh script downloads all the necessary packages for Calamari and sets up the development environment, including the PostgreSQL database. Here's an example of what you will see during the process:
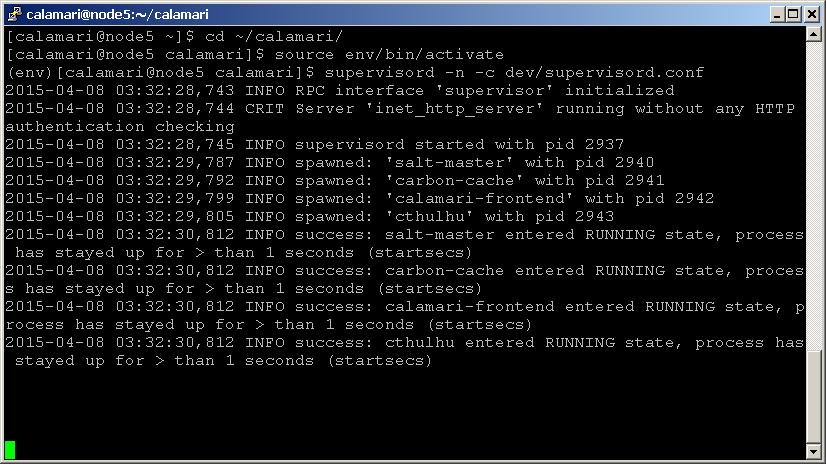
The installation process should have created a /calamari directory. Change to this directory and activate the created Python virtual environment in /calamari/env:shell> cd ~/calamari
shell> source env/bin/activate
You should now be able to start up the various server processes by running the command below:shell> cd ~/calamari
shell> supervisord -n -c dev/supervisord.conf
Here's an example of what you should see:
NOTE: In case you see a number of errors related to salt-master respawning and exiting very quickly, run the following commands, which will correct some Salt directory permissions, then try running the previous command again.
shell> cd ~/calamari
shell> sudo salt-master -d
shell> killall salt-master
You should now be able to browse to your server on port 8000 and see the Calamari REST API interface. For example, if your server IP address is 192.168.56.106, browse to http://192.168.56.106:8000/api/v2/ and you should get an HTTP 503 Forbidden response that looks like this:

If you're not able to access the Calamari API interface on port 8000, check that your firewall is set up to allow connections on that port. For example, you could run the following command to allow connections on port 8000:shell> sudo iptables -A INPUT -p tcp -m tcp --dport 8000 -j ACCEPT
By default, the vps_bootstrap.sh script creates an administrative user for Calamari named admin with password admin. Click the "Log In" menu item and enter these credentials, and you should now see an HTTP 200 OK response and the output of the /api/v2/ API call, as shown below:
image4.png
At this point, the Calamari server is running and you can proceed to connect it with your Ceph cluster.
Step 2: Connect Calamari with Your Ceph Cluster
Ceph cluster nodes communicate with Calamari using Salt minions. To connect a Ceph node to Calamari, follow these steps:- Log in to the Ceph node as the ceph user.
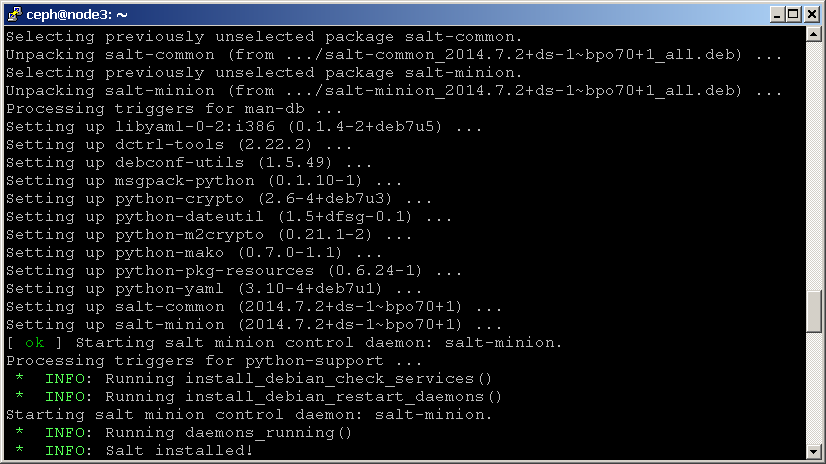
- Run the commands below to install and start the Salt minion on the node. Remember to replace the master's IP address in the fourth command with the IP address or host name for your Calamari server.
shell> wget https://raw.github.com/saltstack/sal...tstrap-salt.sh
shell> chmod +x bootstrap-salt.sh
shell> sudo bootstrap-salt.sh
shell> sudo sh -c "echo 'master: 192.168.56.106' >> /etc/salt/minion"
shell> sudo service salt-minion restart
Here's a sample of what you will see as the Salt minion starts and connects to the Salt master.
Once all the Salt minions are installed and running, you must accept their keys using the Salt master running on the Calamari server. To do this:
- Log in to the Calamari node as the calamari user.
- Run the following commands to list and accept all pending keys:
shell> cd ~/calamari
shell> source env/bin/activate
shell> salt-key -c dev/etc/salt -L
shell> salt-key -c dev/etc/salt -A
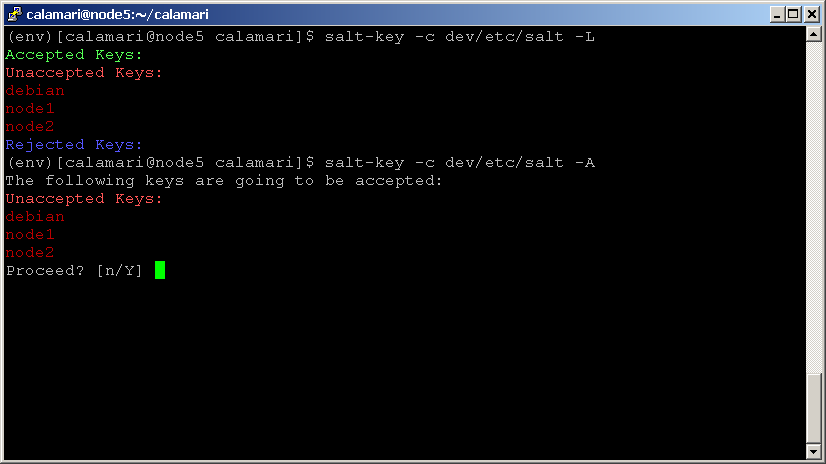
Now, browse to your Calamari server at port 8000 and access the URL endpoint at _/api/v2/_cluster after logging in - for example, at http://192.168.56.106:8000/api/v2/cluster. You should now see your cluster listed, as shown below:

To get a quick overview of the various nodes and their roles in the cluster, try browsing to the _/api/v2/_server endpoint, and you'll see a listing like the one below:
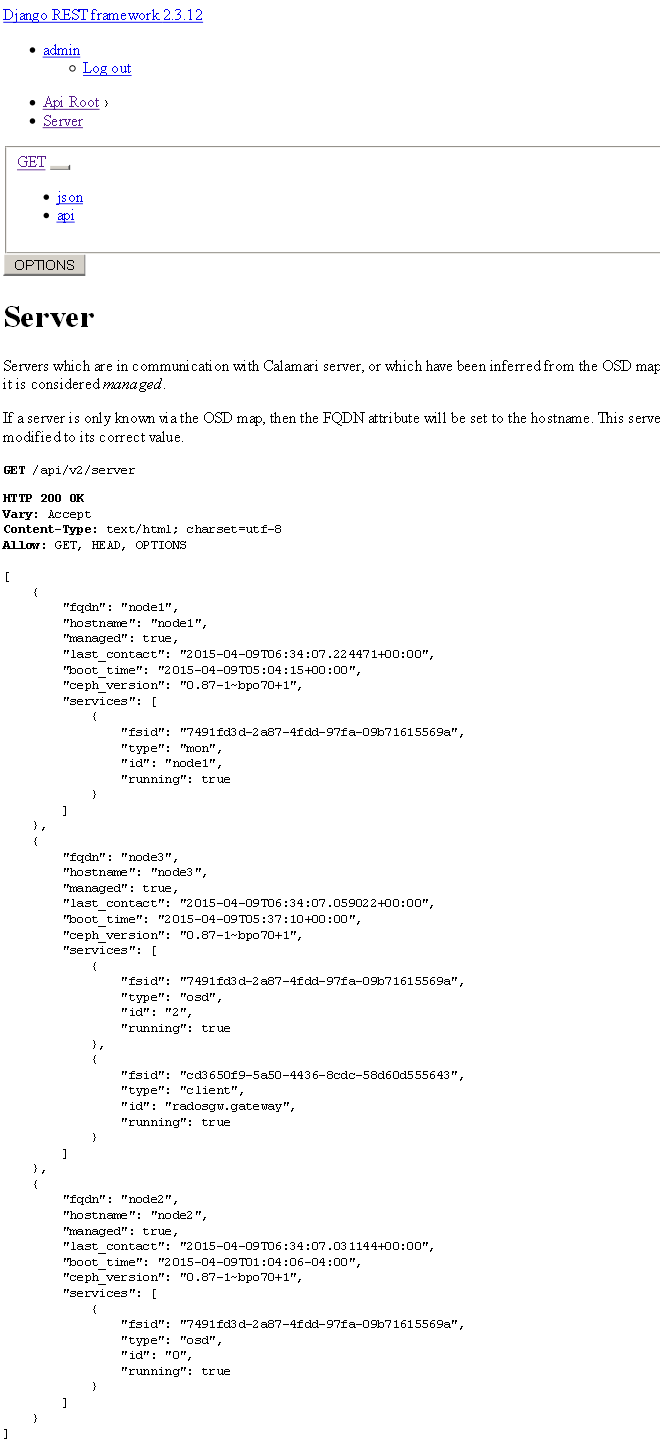
Once you're satisfied that you've got the API working and providing "real" information, flip over to the next page and I'll show you how to perform some common tasks with it from a custom application!
Step 3: Install PHP and Guzzle
I'll be using PHP to build a few simple scripts that interact with the Calamari API. Obviously, to do this, you need a server with PHP installed. This can be either the Calamari server itself, or another server or development environment.
Begin by installing PHP and Apache (if you don't already have them). On CentOS-based systems, use the following command:shell> sudo yum install php curl
If you're using a Debian or Ubuntu-based system, use the following command instead:shell> sudo apt-get install php5 php5-curl curl
Next, create a working directory for your PHP files under your Web server's document root. Download Composer, the PHP dependency manager, into this directory.shell> cd /var/www/html
shell> mkdir calamari-php
shell> cd calamari-php
shell> curl -sS https://getcomposer.org/installer | php
Create a composer.json file in the working directory and fill it with the following content:
{
    "require": {
            "guzzlehttp/guzzle": "~5.0"
    }
}
You should now be able to run php composer.phar install and have Composer download the Guzzle HTTP client for PHP and any related dependencies.
shell> cd /var/www/html/calamari-php
shell> php composer.phar install
Step 4: Handle API Authentication
Before you can begin using the API, you need to understand how to authenticate against it. Here's a quick overview of the steps involved:- Begin by sending a GET request to /api/v2/auth/login.
- You should receive an HTTP 200 OK response containing a cookie named XSRF-TOKEN. Retrieve the value of this cookie.
- Follow up with a POST request to /api/v2/auth/login containing:
- A header named X-XSRF-TOKEN with the token value.
- A JSON-encoded body containing the username and password - for example
{username: "admin", password: "admin"}.
- You should receive an HTTP 200 OK response containing a session cookie.
- You can now proceed to use the API as usual, always remembering to include the session cookie in your requests. Once done, destroy your session by sending an empty POST request /api/v2/auth/logout.
In all the code examples that follow, remember to replace the host name, user name and password shown with correct values for your environment.
Translating the steps above into PHP code, here's what you'll end up with:
<?php
// load classes
include 'vendor/autoload.php';
use GuzzleHttp\Client as Client;
use GuzzleHttp\Cookie\CookieJar as CookieJar;

// define host and credentials
$config = new stdClass;
$config->user = 'admin';
$config->password = 'admin';
$config->host = '192.168.56.106';

// initialize client and cookie jar
$client = new Client(['base_url' => 'http://' . $config->host . ':8000']);
$jar = new GuzzleHttp\Cookie\CookieJar();

// initial request
// get the token
$response = $client->get('/api/v2/auth/login',  ['cookies' => $jar]);
$cookies = $jar->toArray();
foreach ($cookies as $c) {
  if ($c['Name'] == 'XSRF-TOKEN') {
    $token = $c['Value'];
  }
}

// authentication request
// include the token from the previous step
$response = $client->post('/api/v2/auth/login', [
  'cookies' => $jar,
  'headers' =>  ['X-XSRF-TOKEN' => $token, 'Content-type' => 'application/json; charset=UTF-8'],
  'body' => json_encode(array('username' => $config->user, 'password' => $config->password))
]);

// authenticated request for /api/v2/cluster
$response = $client->get('/api/v2/cluster', [
  'cookies' => $jar,
  'headers' =>  ['X-XSRF-TOKEN' => $token, 'Content-type' => 'application/json; charset=UTF-8'],
]);
echo $response->getBody();

// logout request
$client->post('/api/v2/auth/logout');
As discussed previously, the code above demonstrates an initial GET request, followed by a POST request containing authentication credentials. A common cookie jar is used throughout to store the session cookie and once authenticated, this session cookie accompanies all subsequent requests.
Here's an example of the output of the previous code:

Since these steps will need to be performed every time you use the Calamari API, it makes sense to encapsulate them into a class. Here's an example of a custom CalamariClient class, which extends the base Guzzle HTTP Client class with some additional methods:
<?php
// load classes
include 'vendor/autoload.php';
use GuzzleHttp\Client as Client;
use GuzzleHttp\Cookie\CookieJar as CookieJar;

class CalamariClient extends Client {
  // cookie jar
  private $jar;

  // initialize client with cookie jar and base URL
  public function __construct(array $config = [], $host) {
    $this->jar = new CookieJar();
    $config['base_url'] = 'http://' . $host . ':8000';
    $config['defaults']['cookies'] = $this->jar;
    return parent::__construct($config);
  }
  // add token to all requests
  public function createRequest($method, $url = null, array $options = []) {
    if ($token = $this->getToken($this->jar)) {
      $options['headers'] = array('X-XSRF-TOKEN' => $token, 'Content-type' => 'application/json; charset=UTF-8');
    }
    return parent::createRequest($method, $url, $options);
  }

  // perform login
  public function login($username, $password) {
    $request = $this->get('/api/v2/auth/login');
    $request = $this->post('/api/v2/auth/login', [
          'headers' =>  ['X-XSRF-TOKEN' => $this->getToken($this->jar), 'Content-type' => 'application/json; charset=UTF-8'],
          'body' => json_encode(array('username' => $username, 'password' => $password))
    ]);
    return $this;
  }

  // perform logout
  public function logout() {
    $request = $this->post('/api/v2/auth/logout');
    return $this;
  }

  public function getToken($jar) {
    $cookies = $jar->toArray();
    foreach ($cookies as $c) {
      if ($c['Name'] == 'XSRF-TOKEN') {
        return $c['Value'];
      }
    }
    return false;
  }

}
And here's how you'd use it:
<?php
use CalamariClient;
try {
  $client = new CalamariClient(array(), '192.168.56.106');
  if ($client->login('admin', 'admin')) {
    $response = $client->get('/api/v2/cluster');
    echo $response->getBody();
    $client->logout();
  }
} catch (Exception $e) {
  die('ERROR: ' . $e->getMessage());
}
Step 5: Start Using the API
Now that you've got a working, authenticated client, let's look at performing a few common tasks using the Calamari API. First up, checking cluster health and status.
Although v2 of the Calamari API doesn't include a specific method to report cluster health, this is available in v1, as the /_api/v1/cluster/{fsid}/health_ method. To see how it works, consider the following script, which requests this endpoint and processes the response:
<?php
use CalamariClient;
try {
  $client = new CalamariClient(array(), '192.168.56.106');
  if ($client->login('admin', 'admin')) {
    $response = $client->get('/api/v2/cluster');
    $data = json_decode($response->getBody());
    $fsid = $data[0]->id;
    $response = $client->get('/api/v1/cluster/' . $fsid . '/health');
    $data = json_decode($response->getBody());
    echo 'Current cluster status: ' . $data->report->overall_status;
    $client->logout();
  }
} catch (Exception $e) {
  die('ERROR: ' . $e->getMessage());
}
Here, the authenticated client makes two requests to the API. The first retrieves the list of available cluster and selects the ID of the first one. The second sends a GET request to the /api/v1/cluster/{fsid}/health endpoint. The JSON-encoded response includes an overall_status field which includes the current cluster health. Here's what it looks like:

You can also use the Calamari API to map services to hosts, by requesting the /api/v2/cluster/{fsid}/server endpoint. This will return a list of all the nodes that are part of the cluster, together with information on the services running on each. Here's an example of the code:
<?php
use CalamariClient;
try {
  $client = new CalamariClient(array(), '192.168.56.106');
  if ($client->login('admin', 'admin')) {
    $response = $client->get('/api/v2/cluster');
    $data = json_decode($response->getBody());
    $fsid = $data[0]->id;
    $response = $client->get('/api/v2/cluster/' . $fsid . '/server');
    $nodes = json_decode($response->getBody());
    if (count($nodes)) {
      echo '<ul>';
      foreach ($nodes as $n) {
        echo '<li>' . $n->fqdn . '</li>';
        if (count($n->services)) {
          echo '<ul>';
          foreach ($n->services as $s) {
            echo '<li>' . $s->type . ' (id: ' . $s->fsid . ')</li>';
          }
          echo '</ul>';
        }
      }
      echo '</ul>';
    }
    $client->logout();
  }
} catch (Exception $e) {
  die('ERROR: ' . $e->getMessage());
}
The output of the /api/v2/cluster/{fsid}/server endpoint is a JSON-encoded collection of nodes and services (see an example). It's quite easy to convert this collection into a PHP array with the json_decode() function and then iterate over the array, printing each node and its services as a nested HTML list. That's what the code above does, and here's an example of what the output looks like:
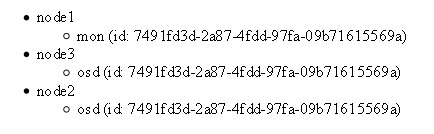
There are a couple of important points of difference between the /api/v2/server and the /api/v2/cluster/{fsid}/server endpoints. The former lists all nodes and services that Calamari knows about, while the latter only lists nodes and services that are part of the specified cluster. If you have an object gateway configured on one of your nodes, it will appear in the output of the former, but not in the output of the latter, since at the time of writing, Calamari does not yet include management integration with the Ceph Object Gateway.
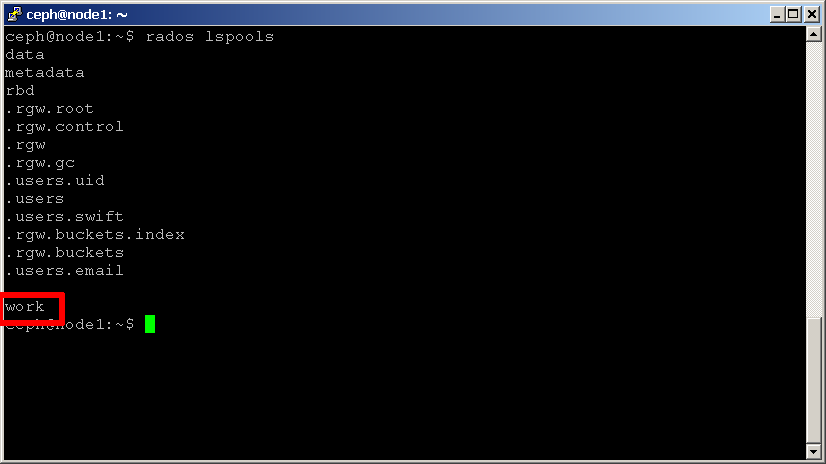
Another common use case involves creating a new pool using the API. This is accomplished by sending a POSt request to the /api/v2/cluster/{fsid}/pool endpoint and including, in the body of the request, a JSON-encoded packet containing the name of the pool and the number of placement groups (see an example). Here's an example of the code:
<?php
use CalamariClient;
try {
  $client = new CalamariClient(array(), '192.168.56.106');
  if ($client->login('admin', 'admin')) {
    $response = $client->get('/api/v2/cluster');
    $data = json_decode($response->getBody());
    $fsid = $data[0]->id;
    $response = $client->post('/api/v2/cluster/' . $fsid . '/pool', [
      'body' => json_encode(array('name' => 'work', 'pg_num' => 100))
    ]);
    $client->logout();
  }
} catch (Exception $e) {
  die('ERROR: ' . $e->getMessage());
}
After you run this code, switch over to your cluster and you should be able to see the new pool, as shown below:
Although the API includes 50+ methods, there's always the possibility that it might be missing one you need. For those situations, you have the /api/v2/cluster/{fsid}/cli method. This method works as an interface to the Ceph CLI, executing the provided command and returning the results as a JSON-encoded response.
To see how it works, consider the following script, which executes the ceph status command using the REST API:
<?php
use CalamariClient;
try {
$client = new CalamariClient(array(), '192.168.56.106');
if ($client->login('admin', 'admin')) {
$response = $client->get('/api/v2/cluster');
$data = json_decode($response->getBody());
$fsid = $data[0]->id;
$response = $client->post('/api/v2/cluster/' . $fsid . '/cli', [
'body' => json_encode(array('command' => 'status'))
]);
$data = json_decode($response->getBody());
echo 'Output of ceph status: <pre>' . $data->out . '</pre>';
$client->logout();
}
} catch (Exception $e) {
die('ERROR: ' . $e->getMessage());
}
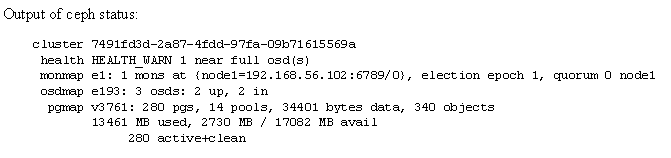
Here, the authenticated client makes two requests to the API. The first retrieves the list of available cluster and selects the ID of the first one. The second sends a POST request with the status command in the body to the /api/v2/cluster/{fsid}/cli endpoint. The JSON-encoded response includes an out field which includes the output of the command. Here's what it looks like:
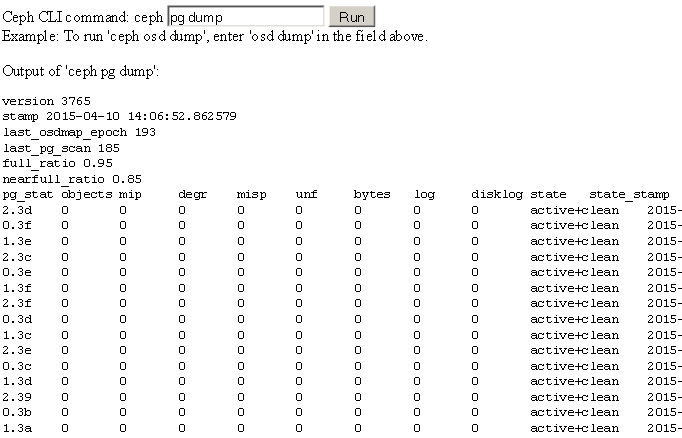
If you wanted to, you could easily revise the previous listing to build an interactive tool that accepts commands through a Web browser and returns the result. Here's how:
  <form method="post">
    Ceph CLI command: ceph <input name="command" type="text" />
    <input  type="submit" name="submit" value="Run" />
    <br/>
    Example: To run 'ceph osd dump', enter 'osd dump' in the field above.
  </form>
<?php
use CalamariClient;
if (isset($_POST['submit'])) {
try {
$client = new CalamariClient(array(), '192.168.56.106');
if ($client->login('admin', 'admin')) {
$response = $client->get('/api/v2/cluster');
$data = json_decode($response->getBody());
$fsid = $data[0]->id;
$response = $client->post('/api/v2/cluster/' . $fsid . '/cli', [
'body' => json_encode(array('command' => $_POST['command']))
]);
$data = json_decode($response->getBody());
echo 'Output of \'ceph ' . $_POST['command'] . '\': <pre>' . $data->out . '</pre>';
$client->logout();
}
} catch (Exception $e) {
die('ERROR: ' . $e->getMessage());
}
}
In this version, the user's form input is transferred into the POST request as a command and the output is displayed as a Web page. Here's an example of it in action:
Conclusion
As you might imagine, there's a lot more you can do with Calamari. This tutorial has illustrated a few common use cases, but the Calamari API also lets you work with CRUSH maps, monitor nodes, OSDs, pools, user accounts and more. With Calamari, you have everything you need to integrate Ceph cluster operations with your enterprise workflows or build your own management and monitoring solution for Ceph.
Read More
Updated by Jessica Mack almost 9 years ago · 3 revisions