Create Versionable and Fault-Tolerant Storage Devices with Ceph and VirtualBox
- Table of contents
- Create Versionable and Fault-Tolerant Storage Devices with Ceph and VirtualBox
- Introducing Ceph
- Assumptions and Requirements
- Step 1: Create Cluster Nodes
- Step 2: Install the Ceph Deployment Toolkit
- Step 3: Configure Authentication between Cluster Nodes
- Step 4: Configure and Activate a Cluster Monitor
- Step 5: Prepare and Activate OSDs
- Step 6: Verify Cluster Health
- Step 7: Test the Cluster
- Step 8: Connect a Ceph Block Device to the Cluster
- Conclusion
- Read More
Introducing Ceph
The cloud is becoming ubiquitous and more and more enterprises, applications and end-users are transitioning their data to cloud platforms. This has created a new challenge for cloud providers, both private and public: building fault-tolerant, high-performance infrastructure that supports big data storage and processing needs, yet is easy to scale and flexible enough to support multiple use cases.
That's where Ceph comes in. Ceph is a distributed storage system designed to provide excellent performance, reliability and scalability. It's open source, so it's freely downloadable and usable, and it offers a unified storage interface that's versatile enough to support object storage, block device storage and file system storage all in the same Ceph cluster.
Ceph is highly reliable, but setting it up can be a little complex, especially if you're new to scalable storage. Ceph is highly reliable, with self-healing and self-managing characteristics. While the quickstart doc is great, we also wanted to provide something a bit more procedural to get you started. That's where this tutorial comes in. Over the next few pages, I'll walk you through the process of building a simple Ceph storage cluster and adding data to it. We'll set up the cluster using VirtualBox, so you'll get a chance to see Ceph in action in a "real" environment where you have total control, but which doesn't cost you anything to run or scale out with new nodes.
Intrigued? Keep reading.
Assumptions and Requirements
For this tutorial, I'll be using VirtualBox, which provides an easy way to set up independent virtual servers, with CentOS as the operating system for the virtual servers. VirtualBox is available for Windows, Linux, Macintosh, and Solaris hosts. I'll make the following assumptions:- You have a working knowledge of CentOS, VirtualBox and VirtualBox networking.
- You have downloaded and installed the latest version of VirtualBox.
- You have either already configured 5 virtual CentOS servers, or you have downloaded an ISO installation image for the latest version of CentOS (CentOS 7.0 at the time of writing). These servers must be using kernel version 3.10 or later
- You're familiar with installing software using the yum, the CentOS package manager.
- You’re familiar with SSH-based authentication.
To set up a Ceph storage cluster with VirtualBox, here are the steps you'll follow:
- Create cluster nodes
- Install the Ceph deployment toolkit
- Configure authentication between cluster nodes
- Configure and activate a cluster monitor
- Prepare and activate OSDs
- Verify cluster health
- Test the cluster
- Connect a Ceph block device to the cluster
The next sections will walk you through these steps in detail.
Step 1: Create Cluster Nodes
If you already have 5 virtual CentOS servers configured and talking to each other, you can skip this step. If not, you must first create the virtual servers that will make up your Ceph cluster. To do this:
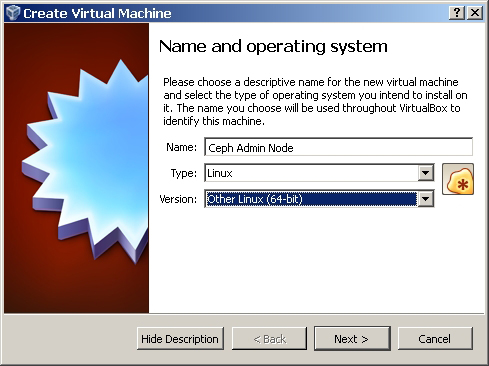
1. Launch VirtualBox and use the Machine -> New menu to create a new virtual server.
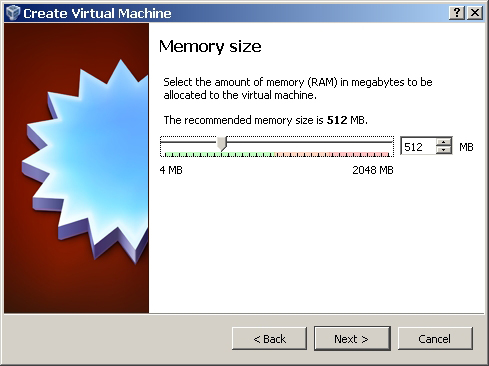
2. Keeping in mind that you will need 5 virtual servers running simultaneously, calculate the available RAM on the host system and set the server memory accordingly.
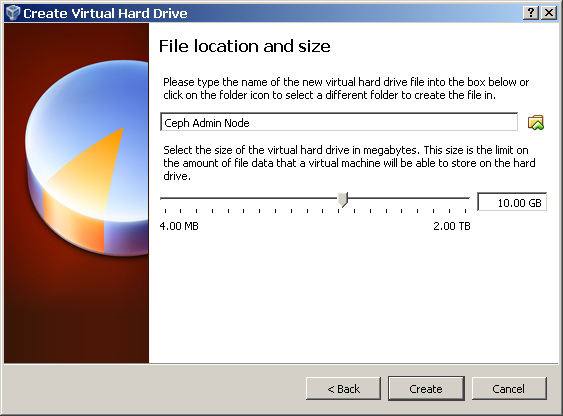
3. Add a virtual hard drive of at least 10 GB.
4. Ensure that you have an IDE controller with a virtual CD/DVD drive (to enable CentOS installation) and at least two network adapters, one NAT (to enable download of required software) and one bridged adapter or internal network adapter (for internal communication between the cluster nodes).
5. Once the server basics are defined, install CentOS to the server using the ISO installation image. Ensure that your kernel version is at least 3.10 or later.
6. Once the installation process is complete, log in to the server and configure the second network interface with a static IP address, by editing the appropriate template file in the /etc/sysconfig/network-scripts/ directory. Here's a sample of what the interface configuration might look like:
HWADDR=08:00:27:AE:14:41
TYPE=Ethernet
BOOTPROTO=static
DEFROUTE=yes
PEERDNS=yes
PEERROUTES=yes
IPV4_FAILURE_FATAL=no
IPV6INIT=yes
IPV6_AUTOCONF=yes
IPV6_DEFROUTE=yes
IPV6_PEERDNS=yes
IPV6_PEERROUTES=yes
IPV6_FAILURE_FATAL=no
NAME=enp0s8
UUID=5fc74119-1ab2-4c0c-9aa1-284fd484e6c6
ONBOOT=no
IPADDR=192.168.1.25
NETMASK=255.255.255.0
GATEWAY=192.168.1.1
DNS1=192.168.1.1
DNS2=8.8.8.8
Should any of the above steps be unfamiliar to you, refer to the VirtualBox manual, especially the VirtualBox networking guide, and to the networking section of the CentOS deployment guide.
Repeat this process until you have 5 virtual servers. Of these, identify one as the cluster administration node and assign it the hostname admin-node. The remaining servers may be identified with hostnames such as node1, node2, and so on. Here's an example of what the final cluster might look like (note that you should obviously modify the IP addresses to match your local network settings).
| Server host name | IP address | Purpose |
| admin-node | 192.168.1.25 | Administration node for cluster |
| node1 | 192.168.1.26 | Monitor |
| node2 | 192.168.1.27 | OSD daemon |
| node3 | 192.168.1.28 | OSD daemon |
| node4 | 192.168.1.29 | Client (block device) |
Before proceeding to the next step, ensure that all the servers are accessible by pinging them using their host names. If you don't have a local DNS server, add the host names and IP addresses to each server's /etc/hosts file to ease network access.
Step 2: Install the Ceph Deployment Toolkit
The next step is to install the Ceph deployment toolkit on the administration node. This toolkit will help install Ceph on the nodes in the cluster, as well as prepare and activate the cluster.
1. Log in to the administration node as the root user.
2. Add the package to the yum repository by creating a new file at /etc/yum.repos.d/ceph.repo with the following content:[ceph-noarch]
name=Ceph noarch packages
baseurl=http://ceph.com/rpm-firefly/el7/noarch
enabled=1
gpgcheck=1
type=rpm-md
gpgkey=https://ceph.com/git/?p=ceph.git;a=b...ys/release.asc
3. Update the repository.shell> yum update
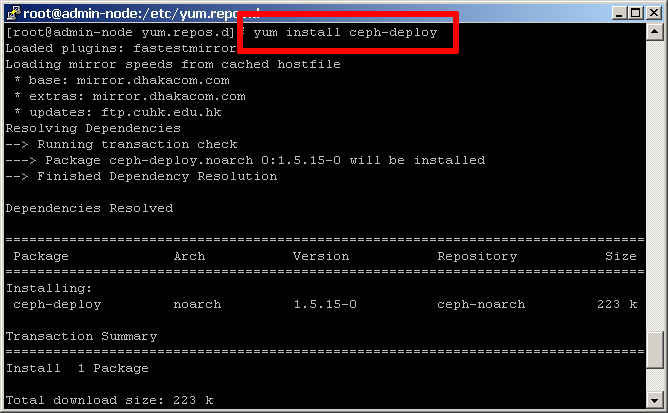
4. Install the Ceph deployment toolkit.shell> yum install ceph-deploy
Step 3: Configure Authentication between Cluster Nodes
Now, you need to create a ceph user on each server in the cluster, including the administration node. This user account will handle performing cluster-related operations on each node. Perform the following steps on each of the 5 virtual servers:
1. Log in as the root user.
2. Create a ceph user account.shell> useradd ceph
shell> passwd ceph
3. Give the ceph user account root privileges with sudo.shell> echo "ceph ALL = (root) NOPASSWD:ALL" | tee /etc/sudoers.d/ceph
shell> chmod 0440 /etc/sudoers.d/ceph
4. Disable 'requiretty' for the ceph user.shell> sudo visudo
5. In the resulting file, locate the line containingDefaults requiretty
and change it to readDefaults:ceph !requiretty
Now, set up passphraseless SSH between the nodes:
1. Log in to the administration node as the ceph user.
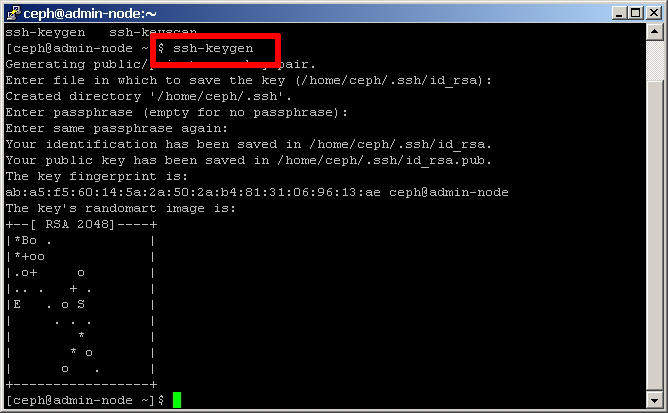
2. Generate an SSH key for the administration node.shell> ssh-keygen
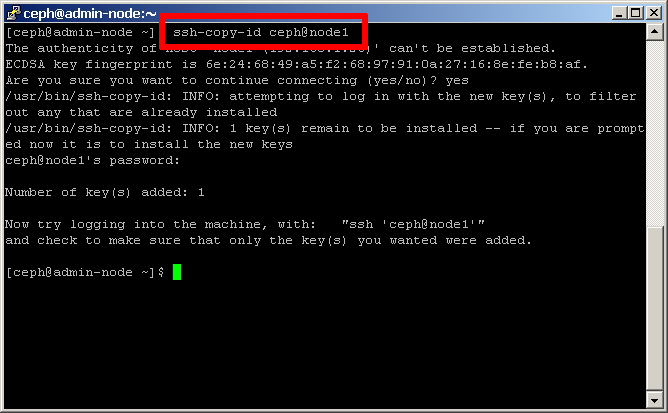
3. Copy the generated public key to the ceph user account of all the nodes in the cluster.shell> ssh-copy-id ceph@node1
shell> ssh-copy-id ceph@node2
shell> ssh-copy-id ceph@node3
shell> ssh-copy-id ceph@node4
shell> ssh-copy-id ceph@admin-node
4. Test that the ceph user on the administration node can log in to any other node as ceph using SSH and without providing a password.shell> ssh ceph@node1

Modify the administration node's SSH configuration file so that it can easily log in to each node as the ceph user. Create the /home/ceph/.ssh/config file with the following lines:Host node1
Hostname node1
User ceph
Host node2
Hostname node2
User ceph
Host node3
Hostname node3
User ceph
Host node4
Hostname node4
User ceph
Host admin-node
Hostname admin-node
User ceph
Change the permissions of the /home/ceph/.ssh/config file.shell> chmod 0400 ~/.ssh/config
Test that the ceph user on the administration node can log in to any other node using SSH and without providing a password or username.shell> ssh node1

Finally, create a directory on the administration node to store cluster information, such as configuration files and keyrings.shell> mkdir my-cluster
shell> cd my-cluster
You're now ready to begin preparing and activating the cluster!
Step 4: Configure and Activate a Cluster Monitor
A Ceph storage cluster consists of two types of daemons:- Monitors maintain copies of the cluster map
- Object Storage Daemons (OSD) store data as objects on storage nodes
Apart from this, other actors in a Ceph storage cluster include metadata servers and clients such as Ceph block devices, Ceph object gateways or Ceph filesystems. Read more about Ceph’s architecture.
All the commands in this and subsequent sections are to be run when logged in as the ceph user on the administration node, from the my-cluster/ directory. Ensure that you are directly logged in as ceph and are not using root with su - ceph.
A minimal system will have at least one monitor and two OSD daemons for data replication.
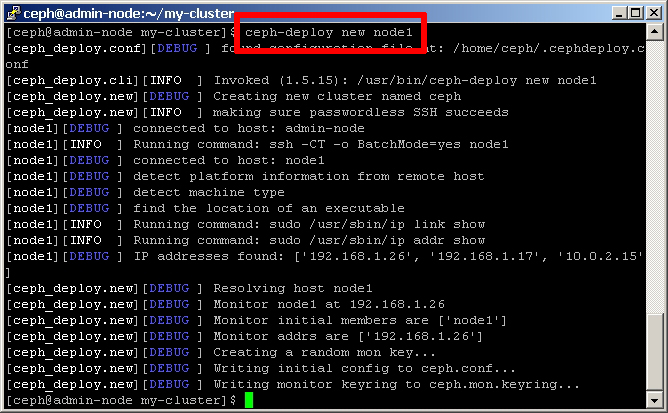
1. Begin by setting up a Ceph monitor on node1 with the Ceph deployment toolkit.shell> ceph-deploy new node1
This will define the name of the initial monitor node and create a default Ceph configuration file and monitor keyring in the current directory.
2. Change the number of replicas in the Ceph configuration file at /home/ceph/my-cluster/ceph.conf from 3 to 2 so that Ceph can achieve a stable state with just two OSDs. Add the following line in the [global] section:osd pool default size = 2
osd pool default min size = 2
3. In the same file, set the OSD journal size. A good general setting is 10 GB; however, since this is a simulation, you can use a smaller amount such as 4 GB. Add the following line in the [global] section:osd journal size = 4000
4. In the same file, set the default number of placement groups for a pool. Since we’ll have less than 5 OSDs, 128 placement groups per pool should suffice. Add the following line in the [global] section:osd pool default pg num = 128
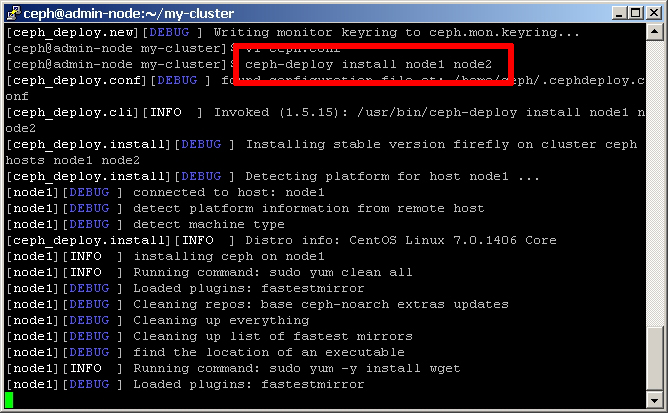
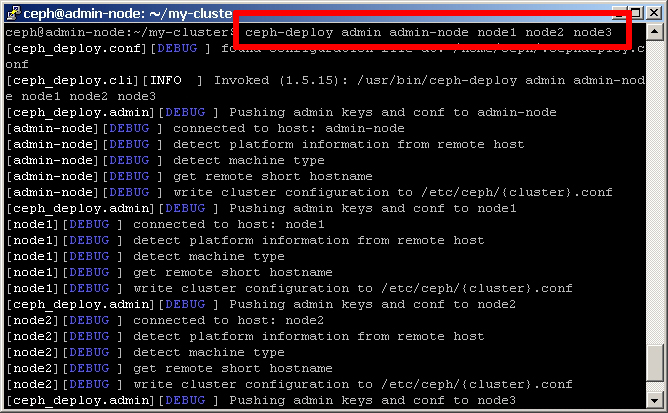
5. Install Ceph on each node in the cluster, including the administration node.shell> ceph-deploy install admin-node node1 node2 node3 node4
The Ceph deployment toolkit will now go to work installing Ceph on each node. Here's an example of what you will see during the installation process.
Create the Ceph monitor on node1 and gather the initial keys.shell> ceph-deploy mon create-initial node1

Step 5: Prepare and Activate OSDs
The next set is to prepare and activate Ceph OSDs. We'll need a minimum of 2 OSDs, and these should be set up on node2 and node3, as it's not recommended to mix monitors and OSD daemons on the same host. To begin, set up an OSD on node2 as follows:
Log into node2 as the ceph user.shell> ssh node2
Create a directory for the OSD daemon.shell> sudo mkdir /var/local/osd
Log out of node2. Then, from the administrative node, prepare and activate the OSD.shell> ceph-deploy osd prepare node2:/var/local/osd

shell> ceph-deploy osd activate node2:/var/local/osd

Repeat the above steps for node3.
At this point, the OSD daemons have been created and the storage cluster is ready.
Step 6: Verify Cluster Health
Copy the configuration file and admin keyring from the administration node to all the nodes in the cluster.shell> ceph-deploy admin admin-node node1 node2 node3 node4
Log in to each node as the ceph user and change the permissions of the admin keyring.shell> ssh node1
shell> sudo chmod +r /etc/ceph/ceph.client.admin.keyring
You should now be able to check cluster health from any node in the cluster with the ceph status command. Ideally, you want to see the status active + clean, as that indicates the cluster is operating normally.shell> ceph status

Step 7: Test the Cluster
You can now perform a simple test to see the distributed Ceph storage cluster in action, by writing a file on one node and retrieving it on another:
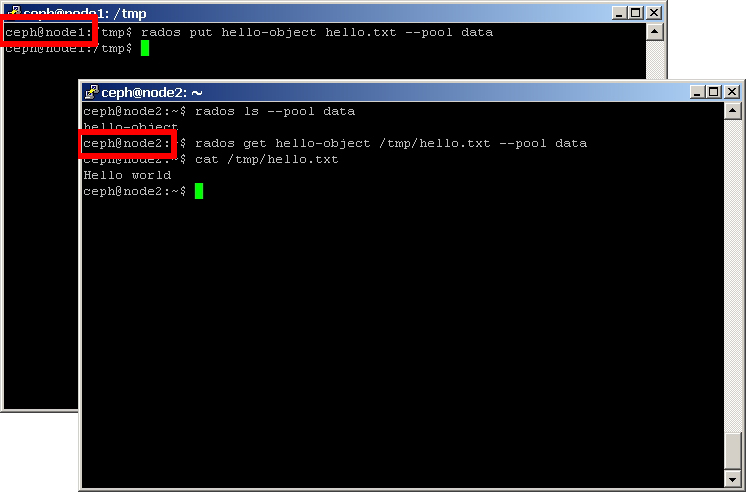
1. Log in to node1 as the ceph user.shell> ssh node1
2. Create a new file with some dummy data.shell> echo "Hello world" > /tmp/hello.txt
3. Data is stored in Ceph within storage pools, which are logical groups in which to organize your data. By default, a Ceph storage cluster has 3 pools - data, metadata and rbd - and it's also possible to create your own custom pools. In this case, copy the file to the data pool with the rados put command and assign it a name.shell> rados put hello-object /tmp/hello.txt --pool data
To verify that the Ceph storage cluster stored the object:
1. Log in to node2 as the ceph user.
2. Check that the file exists in the cluster's data storage pool with the rados ls command.shell> rados ls --pool data
3. Copy the file out of the storage cluster to a local directory with the rados get command and verify its contentsshell> rados get hello-object /tmp/hello.txt --pool data
shell> cat hello.txt
Step 8: Connect a Ceph Block Device to the Cluster
Now that the cluster is operating, it’s time to do something with it. Ceph storage clusters can be accessed by three types of clients: Ceph block devices, Ceph object gateways and the Ceph filesystem (CephFS). The simplest to demonstrate is the RADOS Block Device (RBD), so in this step you'll create a virtual block device client on node4, associate it with a storage pool and then read and write data to it.
1. Log in to node4 as the ceph user.shell> ssh node4
2. Create a pool named work. Within the pool, specify the number of placement groups, which are the number of shards or fragments that the pool is divided into. Placement groups are mapped to OSDs and a larger number of placement groups (such as 100 per OSD) leads to better balancing.shell> ceph osd pool create work 100 100
3. Create a RADOS Block Device image with rbd and connect it with the pool.shell> rbd create image01 --size 1024 --pool work
4. Map the block device image to the actual block device.shell> sudo rbd map image01 --pool work --name client.admin
5. Create a filesystem on the block device and mount it.shell> sudo /sbin/mkfs.ext4 -m0 /dev/rbd/work/image01
shell> sudo mkdir /mnt/ceph-block-device
shell> sudo mount /dev/rbd/work/image01 /mnt/ceph-block-device
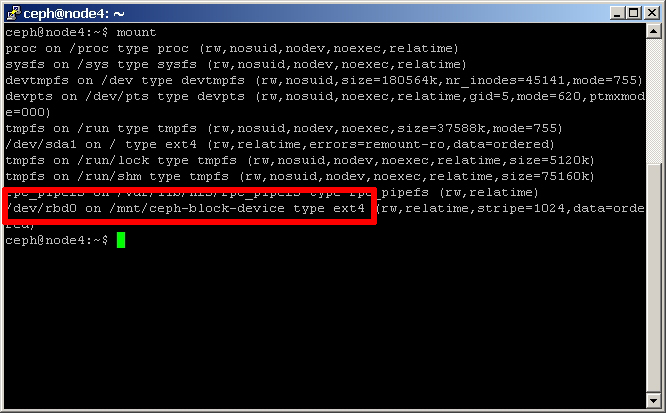
At this point, your Ceph block device is mounted and ready for use. You can write data to it as with any other block device, and your data will be automatically stored in the cluster (with all its resiliency and scalability benefits). Plus, you get a bunch of cool features, such as the ability to create device snapshots, so you can easily roll back to a previous image of the device.
To demonstrate this:
1. Navigate to where you mounted the block device and create a text file. You might need to first change the permissions of the mount point so that you can write to it.shell> cd /mnt/ceph-block-device
shell> vi today.txt
2. Add the word 'Monday' to the file.
3. Then, take a snapshot of the image.shell> rbd --pool work snap create --snap monday image01
4. Edit the file again and this time change the contents to 'Friday'.
5. Unmount the block device. Then, roll back to the previous snapshot and mount it again.shell> sudo umount /mnt/ceph-block-device
shell> rbd --pool work snap rollback --snap monday image01
shell> sudo mount /dev/rbd/work/image01 /mnt/ceph-block-device
When you inspect the contents of the file, you will see the original contents restored.
You must unmount the block device before doing a rollback. If it's mounted when you rollback, the client will have a stale cache, which may cause filesystem corruption, since it's like a hard drive being written by two machines at once.
Conclusion
Just as you can use Ceph block devices, so too can you use the Ceph Object Gateway to create Amazon S3-style storage buckets accessible via REST, or CephFS as a POSIX-compliant scalable, fault-tolerant network filesystem. Setting these up is beyond the scope of this beginner tutorial, but since they both use the Ceph storage cluster that you've already configured, it won't take long for you to get them running. Review instructions for the Ceph Object Gateway and instructions for CephFS.
As this tutorial will have illustrated, Ceph is a powerful solution for creating resilient, infinitely scalable storage. The simple storage cluster you created here with VirtualBox is just the tip of the iceberg: as you transition the cluster to your network or the cloud and add more nodes, you'll benefit from improved performance and flexibility without any loss in reliability and security. What more could you ask for?
Read More
Updated by Jessica Mack almost 9 years ago · 4 revisions